Visualizzazioni totali

lunedì 5 novembre 2012

ROMANIAN POINT LACE - ACINO UVA UNCINETTO

 TRATTO DA http://macrame-rumeno.blogspot.it/


ACINO ad UNCINETTO

 Sembra un po' complicato... ma se ce l'ho fatta io, ce la potete fare pure voi!
Per iniziare, avvolgete il filo per 8 volte attorno ad una matita (o qualcosa di simile).
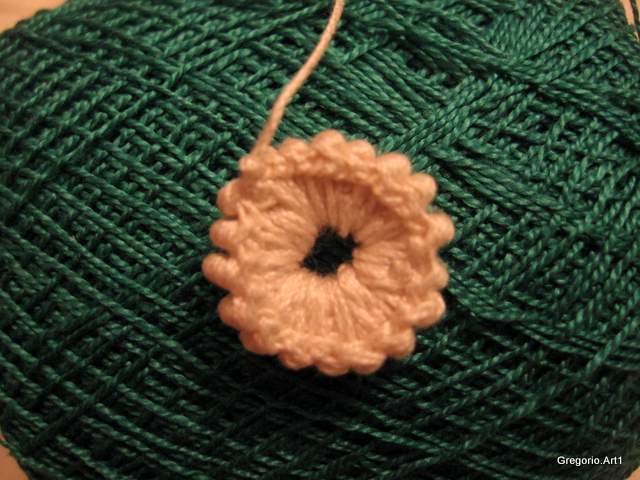
Eseguire nel cerchio 18 punti bassi.
Eseguire un 2° giro di 18 punti bassi coprendo quelli del giro precedente.
Come potete notare ho cambiato uncinetto.
Per eseguire le piccole "barette" è necessario un uncinetto con la stecca d'acciaio sottile e non conica.
Avvolgere il filo 18 volte attorno all'uncinetto.
Adesso la parte più difficile!
Non scoraggiatevi se non riuscite alle prime volte.
Tenendo bene in maniera orizzontale l'uncinetto, dovete far passare il filo in tutti i fili avvolti attorno all'uncinetto.
Assestatelo aiutandovi con le dita, e con un punto basso allungato viene fissato alla base di sostegno. Stringete bene la barretta.
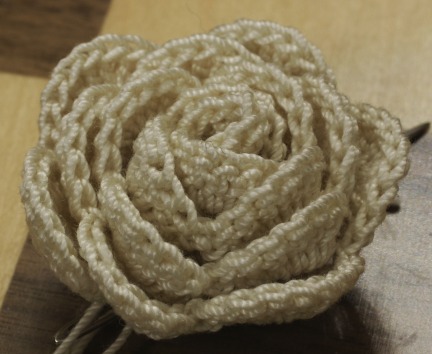
Si prosegue con le altre barrette.
Nel mio esempio ne sono entrate 18, ma ovviamente possono variare in base alla grandezza della base. 


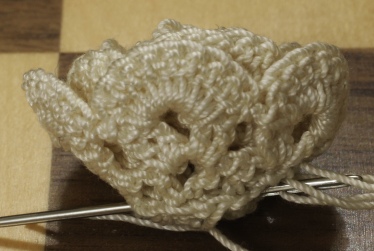
L'acino dal rovescio


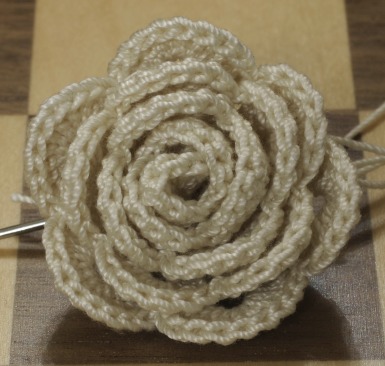
Lasciare il filo lungo abbastanza per poterlo unire agli altri acini.

mercoledì 30 maggio 2012

Sono riuscita a ricostruire le fasi di questo punto stella, tanto richiesto e tanto amato, e che mi è costato tempo fa anche qualche insulto (da parte di chi pensava che non lo volessi spiegare: in realtà non lo sapevo fare bene come ora).
E’ molto simile al punto jazmin o punto gelsomino, tutte notizie avute da terze persone (Jana del newsgroup free.it.hobby.decoupage in primis).
Ho cercato di fare un tutorial fotografico, che spero possa essere d’aiuto, nell’attesa di realizzare un video (amatoriale, moooolto amatoriale).
(aggiornamento del 30/4/2012: ecco il Video)
Segnalatemi qualsiasi imprecisione/aggiunta/modifica, so che tra di voi ci sono super esperte di uncinetto, mica come me! :)


lunedì 23 gennaio 2012

ROSA ALL'UNCINETTO

Strip Method Crochet Rose

By Megan Mills
megan@kiwi.gen.nz


This rose is approximately 3.5cm (1.4 inches) across.


Abbreviations
ss slip stich
ch chain
sc single crochet (UK double crochet)
dc double crochet (UK treble)
sp space

Materials

DMC Cebelia No 10 thread
1.75mm hook
Rose is approximately 3.5cm (1.4 inches) across

Directions

Note: Leave a long tail at the start so that you can use it to roll-and-stitch the rose together.

Row 1: 55ch. Into 4th ch from hook work 1dc. *1ch, miss 2ch, (1dc, 2ch, 1dc) in next st. Repeat from * to the end. Turn. Row 2: 3ch, (1dc, 2ch, 2dc) into first 2-ch sp. *(2ch, 2dc, 2ch, 2dc) in next 2-ch sp. Repeat from * to the end. Turn.
Row 3: 6dc into first 2-ch sp, 1sc into next 2-ch sp. (7dc into next 2-ch sp, 1sc into next 2-ch sp) 12 times. (9dc into next 2-ch sp, 1sc into next 2-ch sp) five times. Leave a tail long enough to weave in easily and fasten off.

Finishing

Thread the long tail onto a needle and as you roll the rose up stitch the base together. The large petals end up on the outside of the rose so start rolling from the small-petalled end. Try to keep the base flat - if it 'telescopes' the rose will not be as pretty. You can then use the tail to attach your rose to another item or tidy away the end.

I haven't bothered finishing it properly - I just rolled and stitched it
and took the photos for you to see.


BORSE A FORMA DI CASETTA


Ho realizzato queste borse utilizzando della stoffa di misto cotone di media pesantezza, il tetto e le pareti hanno una leggera imbottitura in poliestere, fondo rigido, decorazioni floreali yo-yo clover, la tracolla è rimovibile.


mercoledì 11 gennaio 2012

Albero di Natale a punto coccodrillo


copiato dal sito www.crochetme.com
Crocodile Stitch Christmas Tree by Thelma Lockhart
H, G, F and E hooks
Special st: the crocodile st is worked over the 2 dc’s that are made together in the 1 dc. 5 dc are worked around the 1st dc, then another 5 dc worked around the 2nd dc. To work your 1 st, 5 dc you must turn your working piece on its side to the right, so you will work your 5 dc from the top of the side post downwards. When working the other side, you will turn your working piece on its side to the left, so you will work your 5 dc from the bottom of the side post and upwards
With H hook
Row 1: Ch 43 and slip stitch in first ch (be sure not to twist chain).
Row 2: Ch 1 and sc in each ch across (42 sc)
Row 3: Ch 1 and in same sc do 2 dc,, ch 1 *sk 2 sc, 1 dc in next sc, ch 1, sk 2 sc in next sc, ch 1, sk 2 sc, 2 dc in next sc, ch 1*
Same as between* across to last 3 sc, sk 2 sc and in last sc put in dc and sl st into first dc, ch 1 and turn Now you will start crocodile stitch
Row 4: Should have 7 groups of crocodile stitch. At end sl st through last dc,
Row 5: Repeat row 3
Row 6: Repeat Row 4
Change to G hook
Row 7: Repeat row 3
Row 8: Crocodile Stitch row
Row 9: Repeat row 3 but put 3 decreases in this row
Row 10: Crocodile Stitch row (6 groups of crocodile st)
Change to F hook
Row 11 Repeat row 3 but put 3 decreases in this row
Row 12: Crocodile Stitch row (5 groups of crocodile st)
Row 13: Repeat row 3
Row 14: Crocodile Stitch row (5 groups of crocodile st)
Change to E hook
Row 15: Repeat row 3 but put 3 decreases in this row
Row 16: Crocodile Stitch row (4 groups of crocodile st)
Row 17 Sc in each st,
Row 18 to end - do not sl st, just keep going around decreasing in each 2 stitches until you only have one sc left, fasten off
Now place a star on top. You can crochet a small one or use a large star button.